Your basket is currently empty!
Indigo: How to extract pigment from plants
Indigo, or indigo precursors to be precise, can be found in a variety of plants. At least two of these can be cultivated well here (that is Germany/and most of Europe). It's not visible from the outside though. Both Dyer's knotweed Polygonum tinctorium and woad Isatis tinctoria contain indigo precursors in their lush green leaves. When these leaves are bruised or dry it starts to show, they turn a bluish colour.


This indigo precursor can be extracted from the leaves, turning into indigo. You end up with a blue paste, or blue powder, if you let it dry and then grind the pigment. In dyer's knotweed the precursor is called indican, in woad it is also called isatan. The process mostly the same for both of these despite of the different names. While the 'mechanism' may be the same, there are very different ways to obtain blue around the world. Just as there are a variety of indigo-bearing plants.
Before transatlantic trade, colonization and not least the labor and knowledge of enslaved people in the "New World" brought other forms of indigo to Europe more cheaply and in larger quantities, the important indigo plant here was woad. Woad was often first formed into 'woad balls', fermented and dried. In this form woad was then ready for storage, trading or dyeing. However, you can also extract indigo from woad using the method described here.
In Japan, for example, the 'sukumo' method still exists today. In this method, large quantities of knotweed are composted, whereby moisture and heat trigger a decomposition process. The fermented end product is then used directly to prepare a vat for dyeing, as with woad balls, instead of first separating the pigment.
Side note: Vatting indigo
To dye with indigo it is not necessary to extract the pure pigment from the leaves. But once transformed the pigment is very stable when kept dry and is also suitable for other applications. It can be used like any other pigment, with a binder for painting, you can use it to make your own crayons or watercolors.
The actual indigo dyeing happens in a vat. This describes a specific dye process, and is not a general term describing all dye baths.
Why? Indigo as a dye is not water soluble. The dyeing process therefore works differently than with most other dye plants. An indigo vat creates very specific conditions for the blue to appear. For one thing, it needs a fairly alkaline pH, plus a reducing agent that pulls oxygen out of the indigo molecule—then it's finally ready to bond. In the vat, the indigo molecule has a new name, leoco-indigo or white indigo. Despite the name, the vat is not white, but (usually) yellowish. In this form, indigo finally combines with (for example) the textile fiber. When the dyed yarns or fabrics appear from the vat, they are yellow at first, and then slowly change to shades of blue via green in the air!
Wenn ich Pigment aus Färberknöterich extrahiere, trockne ich das am liebsten, einige Zeit kann man aber auch die Paste gekühlt aufbewahren. Pulver oder Paste, mit beidem kann man Küpen ansetzen. (Workshop-Termine, um das Färben mit Indigo zu lernen gibt es here.)
Equipment to extract indigo
Unless you're processing large quantities of the leaves, you don't need a lot of equipment to extract indigo, you probably already have most of it.
You'll need a bucket or a tub that can contain all the leaves you want to process. I mostly use a mortar bucket and a bowl that can cover all of the leaves to submerge them.
Later I use a colander and cheesecloth or a fine mesh bag to drain the liquid and remove the leaves.
A whisk, (or a second bucket instead) is handy, for larger quantities you might want to use a mixer or drill with mixing attachment.
The only actual ingredient besides plant and water is slaked lime (please read how to work with slaked lime safely below, before jumping into the adventure), and I like to have ph strips on hand. For testing if your solution is ready a small lidded jar is handy. As are a mask, gloves, goggles.
To filter the pigment later on, you can use coffee filters, very densly woven fine fabric, screen-printing mesh, etc. For the last step, I like to use large jars (like mason jars or empty pickle jars).
Extract Indigo: Harvest leaves
For hobby and small scale indigo gardeners the aqueous extraction is probably the most accessible, unless you prefer dyeing with fresh leaves using the salt rub method .
It's starts with harvesting the plants. I snip the plants approximately 15-20cm above the ground, so the plants sprout new leaves again quickly. I harvest two to three times each summer, before then allowing the plants to flower in the fall to harvest seeds. For good harvests, dyer's knotweed needs a nutritious soil. During the summer I also fertilize the plants, I mostly use liquid nettle manure. It's generally recommended to harvest after a few sunny days, for optimal yield.
Because it's helpful later in the process*, I often remove the leaves from the stalk. That's quite a bit of work – so you can also just ferment the stems along with the leaves. The stems don't contain dye. The stems are easy to re-root if you want more indigo plants, just put them in water for a few days!
*I find squeezing the plant matter after fermenting easier without the stems, as I don't have a press to help. Also my favourite bucket for that process often can just hold all of the leaves, and I'd have to size up if I didn't remove the stems. But you can definitely omit that step!
Soaking and fermenting the leaves
The leaves are now placed in a bucket or tub, and should preferably be weighted down. Cover everything with. I prefer using cold water for this in the garden, and then wait a few days. Mostly I place the bucket with the leaves into our garden shed. But it could certainly stand outside if you cover it with a net! This set up works best for me, as it takes place in my alotment garden and I can't watch the process as closely as you might, if your garden is right by your home.
The leaves are now fermenting in the water - you should observe this process, because the duration can vary quite a bit. I prefer the rather cool and slower variant (especially because I can not always check daily in the garden), but you can use heat to speed up the process.
By using a black bucket/tub and placing everything in the sun, or even starting with hot water. If you do, keep an eye on your extraction.
The next step is hard to describe with only words. If you have the time, I would definitely recommend several small harvests for the beginning, to get acquainted with the process.
Depending on the temperature, this stage now takes a few days. Slowly, fermentation starts and the indigo precursor is released from the leaves. The leaves become paler and somewhat slimy during fermentation. The color of the liquid shifts, and the smell is another important clue - both are unfortunately difficult to describe.
How to know when your leaves are done fermenting
The liquid becomes turquoise to aqua over time, alternating between green and blue, a really special color. A shimmering film forms on the surface, but it can be very subtle, some bubbles rise. There are small blue spots on the surface - I can recognize them well on the bottom of the white bowl I use for weighting the leaves down. The leaves are no longer bright green. And your nose will notice the changes. The smell becomes fruity, sweet and ferment-y over time, and especially if the whole thing ferments a little too long, also unpleasantly putrid.
Overfermented indigo pigment will end up being less blue, more greenish. If you're unsure, pull the leaves out and move to the next stage, while fermenting the used leaves once more with fresh water. I always do this secondary fermentation now to get the last bit of color.
It is instructive to allow a small portion to overferment on purpose and to observe it closely. I did that (unintentionally) the first time I tried, and therefore know the typical smell of overfermenting quite well by now.


After fermenting: Slaked lime
The next step requires an additional ingredient: usually slaked lime(calcium hydroxideis used. When you work with slaked lime for the first time, read the hazard warnings carefully! Wear gloves and a respirator, preferably also protective goggles. The fine dust should never get into the eyes or respiratory tract. Dissolved in water, slaked lime is highly alkaline (which is helpful in the process), and can be corrosive. When mixing slaked lime and water, always add the lime to the water, never the other way around! Otherwise it will dust very heavily, which should definitely be avoided.
Why do you use slaked lime here, which should really only be used with caution? On the one hand, we need the alkaline pH that it creates. There would be other, less harmful agents for this, such as soda ash. For one soda ash is not as strongly alkaline. It also doesn't act as a 'flocculant'. Lime does, and thus binds indigo, which then precipitates out of the liquid, settles and can be filtered off.
Strain liquid and aerate
How to test for blue
Fill a small screw-top glass with the liquid. Add a small spoonful of the slaked lime. Close the jar properly - because now you need to shake it thoroughly. Wait a little while. If you don't see blue after a few minutes, your liquid isn't ready yet. Otherwise, here we go! ( If I remember correctly, I saw this tip first, at Iris' dreambird studio )
When you are ready for the next step, the leaves are removed from the liquid. Pour them through a sieve lined with a cloth, and then use the cloth to squeeze them well. If you have a suitable net (like a fine-meshed laundry net) for your leaves, you could also ferment them in it right from the beginning. The leaves can go on the compost, or if they still look rather green / not yet very slimy, you can ferment them a second time.
Two things must now happen to the liquid: The slaked lime is added until a sufficient pH value is reached. And the liquid must be 'aerated'. I find it best to start with the lime. But I know some prefer the reverse order as well, so might want to try both and find out your preferred method.


Add slaked lime and aerate
While observing the safety rules, I add small amounts of slaked lime. I usually start with half a tablespoon and stir until it has dissolved. Of course, this also depends on the amount of water - for every ten liters, I would add 1 to 1.5 tablespoons of slaked lime. With the slaked lime, the color of the liquid changes (often, not always), becoming yellowish or cognac. I use a pH strip to measure the pH, it should be around 10 or 11. Too much of the slaked lime does not do harm per se, but ends up contaminating the pigment, making it a lighter blue.
Once the required pH is attained, aerate the liquid. Either stir vigorously with the whisk for a few minutes, or pour the liquid back and forth between two buckets to 'incorporate' air. (If neither is available, a flower pot that has holes at the bottom can also be used to keep scooping liquid for aeration). I do this for ten to fifteen minutes. This changes the color of the liquid and the foam that is created. The foam is dark blue first, later it gets lighter, almost white.
And now, wait for the pigment to settle
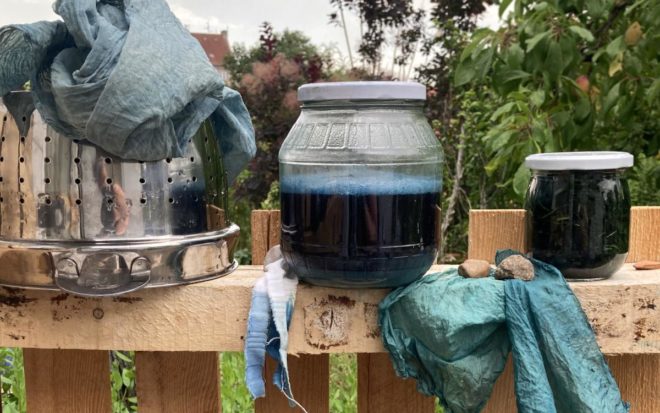
When you're done, the liquid is left to stand until the pigment settles to the bottom. This can take a while, I usually just check back the next day. The liquid* can then be carefully skimmed off as long as the pigment is not stirred up. If this happens, wait again until it settles. When there is only a little liquid left, I usually pour it through coffee filters into different large jars. That way I can easily see if pigment has escaped, and is settling at the jar's bottom. I then let my pigment dry in the filters.
You could also try very fine silk for filtering (must be very tightly woven), silk screen nets or special reusable filters for filtering.
[*The liquid is alkaline. If you want to make a kup soon, you could keep it for that. If you want to pour it e.g. on the compost, the pH value should be neutralized. This can be done quickly with the addition of vinegar essence, for example].


Indigo paste
If you want to store your indigo as a paste, you don't need a filter at all. You can divide it into several shallow containers that you cover with a net and wait for the excess water to evaporate. Refrigerated, in well-sealed containers, preferably filled to the brim, it will also keep for at least months. To prepare a vat, a paste is advantageous, because the pigment is already wet, and you do not have to rehydrate it.
Washing the pigment
Washing the pigment is not necessary, but creates a more pure and concentrated pigment. This can be done to remove other plant matter, or to dissolve excess lime. For the former, I take my pigment in the filter and rinse it with water. To remove excess slaked lime you need an acid, for example citric acid dissolved in water. When you mix the pigment with it, it will foam, and can then be rinsed with clean water.
Have I forgotten anything else? Have you already extracted indigo yourself and have further tips?
If you want to read more: A great book on working with fresh leave indigo is John Marshall's “Soulful Dyeing for All Eternity. Singing the Blues”A fantastic group (on facebook) for questions and to share your own results is Indigo Pigment Extraction Methods. Do you want to grow indigo bearing plants like Dyer's knotweed and woad, I offer seeds and my E-Book (only in German) offers help in creating a dye. garden.

Comments
10 responses to “Indigo: How to extract pigment from plants”
-
Hallo Elke,
ich finde das ganz wunderbar von dir, dass du bereit bist, deine Erfahrungen und Kenntnisse offen zu teilen. Es gibt doch einige Kursanbieterinnen, aber es hat nicht jeder immer die finanziellen Möglichkeiten.
Ich habe leider nur eine einzige Waid-Pflanze in diesem Jahr – wird wohl nicht reichen für eine Küpe. Und vom Färberknöterich habe ich auch nur eine Pflanze, die ich durch einen abgebrochenen Zweig vermehrt habe, hier werde ich vielleicht noch einen kleinen Versuch mit Salz wagen und die Pflanzen dann reinholen, in der Hoffnung auf Saatgut.
Dafür blüht jetzt wenigstens die Schwefelkosmee unerbittlich. Habe schon einige Blüten gepresst, einige getrocknet und eine Handvoll werde ich zu Farbe verarbeiten.
Ich wünsche dir noch volle Kurse in diesem Jahr und vielleicht sehen wir uns im kommenden Jahr wieder!
Liebe Grüße
Andrea
Dein Kurs zum Farbe herstellen war wirklich sehr gut und empfehlenswert. Eine Frage habe ich allerdings noch hierzu: Wenn man den Stoff vorher beizt, verändert sich die aufgetragene Farbe sicherlich, aber würde man sich dadurch nicht den Zusatz von Modifizierern sparen? Könnte man eventuell auch auf das Dämpfen verzichten oder ist dies unbedingt erforderlich für die aufgetragene Farbe?-
Liebe Andrea,
oh ja, mit einzelnen Pflanzen würde es nur eine winzige Küpe. Aber genau, du kannst die Blätter ja auch frisch verwenden (oder auch trocknen für später).
Und schön, dass dir der Kurs zum Farbe machen geholfen hat.
Was das vorbeizen der Stoffe betrifft, ja, wenn man das macht, kann man darauf verzichten, die Paste mit Beize zu mischen. Es hat aber auch Nachteile, darauf bin ich auch im Heftchen zum Workshop eingegangen. Oft bluten die Farben stärker aus.
Wenn du Stoffe waschen und aktiv benutzen möchtest, empfehle ich Dämpfen sehr! Ansonsten gib den Stoffen lange Ruhezeiten vor dem Waschen.
Liebe Grüße und bis zum nächsten Mal 🙂
-
-
Liebe Elke, vielen lieben Dank für die genaue Beschreibung, das war sehr hilfreich. Ich hab mich gerade das erste Mal in der Pigmentextrahierung versucht und habe ca. 10-12g rausbekommen. Jetzt frag ich mich, wie es mit dem Pigment weitergeht. Kann ich das direkt nutzen, um ein Farbextrakt zur Herstellung von Druckpaste anzusetzen?
Es grüßt dich herzlich Rosa-
Hallo Rosa,
freut mich, dass es geklappt hat!Das Pigment kann jetzt wie jedes andere pigment verwendet werden – also mit einem Binder deiner Wahl angemischt werden z.B. Für manche Zwecke ist es gut, das Pigment nochmal zu waschen, wenn nicht geschehen, mit etwas Zitronensäure oder Essig in Wasser. Das neutralisiert den ph-Wert und macht das Pigment reiner.
Was nicht geht, ist dieses Pigment wie (wasserlösliche) Farbstoffe/Farbstoffextrakte zu einer Druckpaste anzurühren, wie wir es im Kurs besprochen haben, weil es ja nicht wasserlöslich ist.
(Und zur Erläuterung für alle anderen, Rosa war in einem Onlineworkshop zum Malen und Drucken mit Pflanzenfarben.)
Viel Erfolg damit!-
Hej Elke, vielen lieben Dank für deine schnelle Antwort! Ja, ich hab mich auch gefreut, allerdings ist es eher ein Flaschengrün-Petrol geworden, da ich geruchsblind bin, hab ich den richtigen Moment verpasst und zu lange fermentiert 🙂
Hast du schon mal aus einer Waidküpe Druckpaste hergestellt? Ich überlege jetzt eine kleine Küpe anzusetzen, die ich dann für die Druckpaste verwende. Eine Idee könnte es sein, die Küpe selbst recht hoch konzentriert anzusetzen, oder die Küpe im Anschluss etwas einköcheln zu lassen, meinst du, das könnte funktionieren? Liebe Grüße!-
Hm, manchmal wird aus Grün auch noch Blau, wenn man das Pigment sauer wäscht. Vielleicht geht da noch was!
Wenn du die Küpe so stark erhitzt/kochst, dass sie reduziert, glaube ich nicht dass die Küpenchemie dabei noch funktional bleibt. Bei allen Küpenrezepten die ich kenne achtet man darauf, sie nicht zu stark zu erhitzen. …Das wäre jetzt meine Vermutung, ich habe Indigo bisher immer als Pigment verwendet (mit Binder) für Mustergestaltung o.ä.
Aber schau mal in Boutrup und Ellis‘ Art and Science of Natural Dyes. Die haben ein Rezept zum Drucken mit Indigo! Hab ich aber noch nicht getestet.
Viele Grüße!
-
-
-
-
Ah, ok, dann werd ich das noch mal sauer waschen. Und danke für den Tip mit dem Art and Science of Natural Dyes Buch, ich hatte das gestern erst in der Hand, hab aber wohl genau das Rezept übersehen. Ich schau gleich noch mal nach. Vielen lieben Dank für deine Unterstützung!!! Liebe Grüße 🖖
-
Hallo, sehr toll dieser Artikel. Beim ersten Mal habe ich leider das ganze etwas zu lange stehen lassen und es hat überfermentiert (schätze ich). Ich würde den Geruch wie Fischfutter bzw. Aquariumwasser beschreiben und habe jetzt ein Türkises Pigment. Beim zweiten Mal war ich rechtzeitig dran, aber das Pigment trennt sich nicht vom Wasser. Soll man nochmal versuchen Kalk unterzumischen, oder was könnte die Lösung sein? Vielen Dank und nochmal Kompliment für den Artikel, wirklich sehr hilfreich 🙂
-
Vielen Dank, freut mich, dass dir die Anleitung geholfen hat!
Und das Überfermentieren gehört einfach dazu, ist mir auch nicht nur einmal passiert. Und aus deinem Problem, dass sich das Pigment nicht absetzt, hast du schon die richtigen Schlüse gezogen. Beides sind Optionen. Ich mische in dem Fall meist nochmal wenig Löschkalk unter, und wasche das Pigment dafür hinterher, um den Kalk-Überschuss zu entfernen. (Vor allem wenn ich das Pigment für Wasserfarben o.ä. benutzen möchte). Wenn du damit eine Küpe ansetzen möchtest, wäre das nicht unbedingt nötig.
Es gibt auch Leute, die grundsätzlich keinen Kalk dazugeben beim letzten Schritt, sondern warten, dass sich das Indigo allmählich von allein absetzt. Ich war dafür meist zu ungeduldig. Das soll wohl schneller gehen, wenn es eher warm ist!
Viel Erfolg!
-
-
vielen Dank 🙂
Leave a Reply